 Facebook
 X
X
 Pinterest
 Copy Link
Tales of the Epoxy Countertops
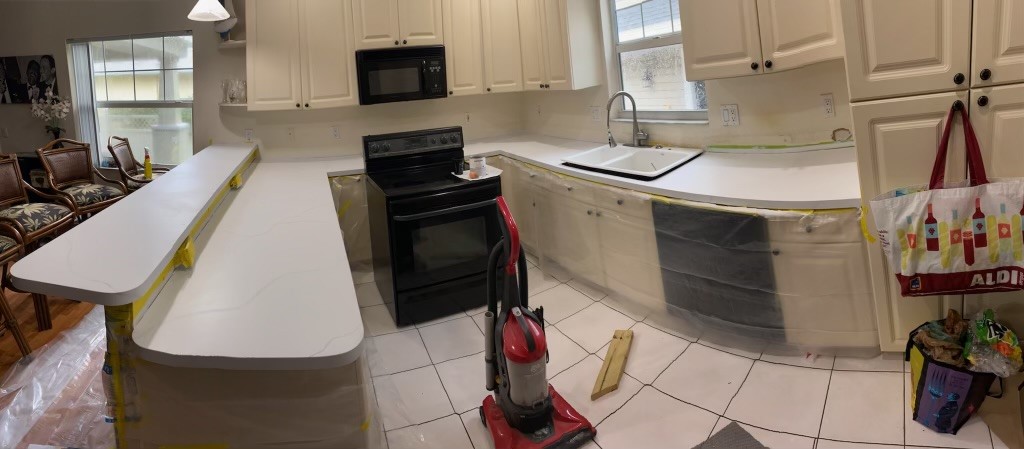
I sat there and stared at the ugly speckled laminate countertops. I sat and just stared at them.


We didn’t have the budget for the lovely upgrade of stone I would have loved, but i HAD to get rid of the ugly laminate….and fast!
I had been working with epoxy for a year or so on other little projects, but this was the biggest epoxy project to date. A lot like concrete this 2-part epoxy is a thoroughly mix, pour, self-level, remove bubbles, and let cure and harden application.
Step 1: Painting
I didn’t have endless epoxy on hand, so i knew i was better off painting the black countertops and using a clear epoxy rather than tinting the epoxy to cover up the black laminate.
I decided to paint the countertops white and added a little grey veining using a paintbrush and softening the paint line with a wet sponge. Now…in hindsight, I think i would have stuck to the pure white without adding the veining. Maybe I’ll do another pour down the road.
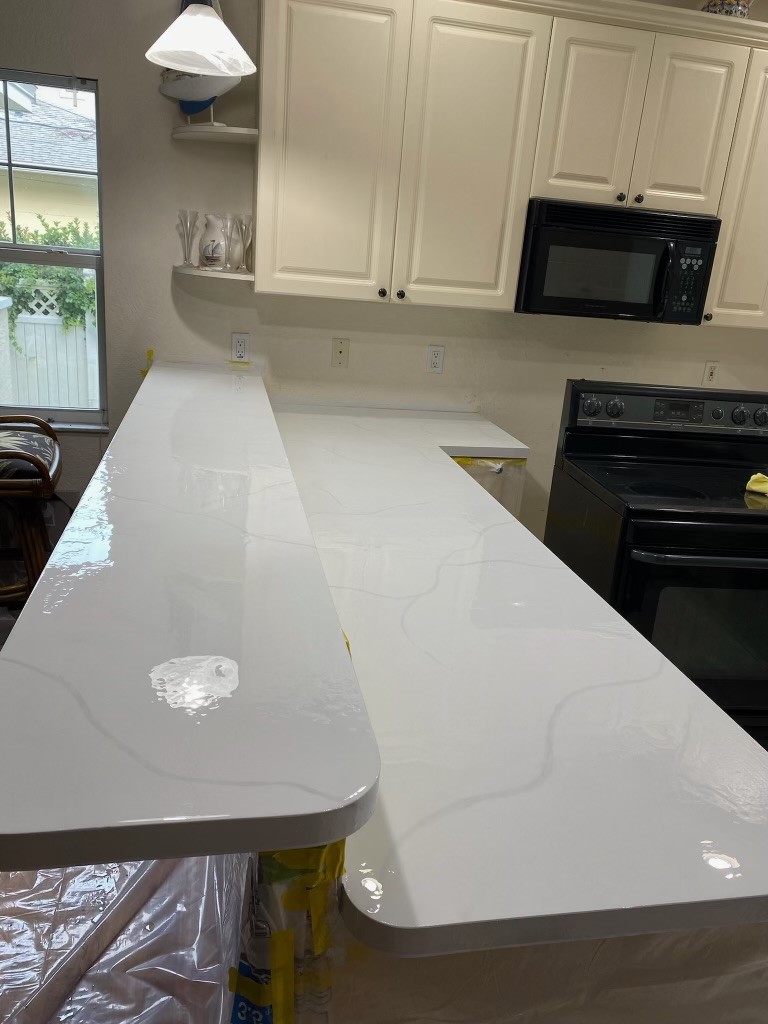
Step 2: Epoxy
I added equal part A and part B into separate containers and then combined them into a 3rd container for mixing. I cannot stress this enough THOROUGHLY MIX! Let me repeat that Thoroughly Mix!! Use a paint stick to scrape the sides to make sure nothing is stuck to the sides. (See the Trial and Error notes for an explanation)
Once mixed pour evenly over the countertops. I used my disposable gloved hands to help evenly move the epoxy to cover the countertop. It will self level, but i wanted to make sure everything was covered. Make sure to get the edges with a thick coat as it will self level off the countertop due to gravity. I saved a bit of epoxy to add to the edges a few minutes later to make sure there was enough epoxy on the edges. It will thicken for that second round on the edges, so don’t wait too long.
Step 3: Bubbles and Drips
Once countertops are self leveled and the second round on the edges (not too long maybe 5-10 min) take your heat gun and run it quickly over the counter to pop the remaining air bubbles. You can also use a precision torch to make sure you get even the smallest bubbles. **CAREFUL NOT TO BURN THE EPOXY*** Keep a bit of a distance and use quick passes.
As the epoxy drips from the edge of the countertops scrape the dripping epoxy with a paint stick. It will continue to drip over the curing time and to avoid cured drip bumps keep scraping off the excess.
I let my countertops cure and harden over night.
The amount of epoxy and paint you will need will very based on the amount of counter space you have but i used the thin plastic paint buckets. I would not use the industrial plastic bucket as you will probably ruin it. (I was able to remove the hardened epoxy later on by bending and cracking off the epoxy in pieces.)
“Don’t Forget” Items and Tips
- Plastic Sheet the areas around the countertops. Being a self leveling product, the epoxy wants to run! and you don’t want it all over your floors.
- Wear protective safety gear (eyewear, disposable gloves, respirator) and be in a well ventilated area.
- As noted above wear disposable gloves and have excess on hand. Epoxy is ultra STICKY and is incredibly hard to remove after the fact.
- If your heat gun is corded please make note of the cord and extension cord. Do not let it drag in the epoxy…it will break your little heart with a heck of a mess not to mention it could ruin the cord. Yes this happened – face palm!!!
Trial & Error
Ok so here is the explanation…..
The FIRST go around I put Part A and Part B together in one bucket and mixed with a stir stick but failed to scrape the sides. Thinking back on it I’m not even sure i had equal parts A and B let alone mixing it well. I also know I failed to scrape the sides, so as i was running out and scraping the sides it was not a mixed product but merely part A or part B on the sides.
The next day when i excitedly checked my work expecting a beautifully cured counter, to my horror I was sorely disappointed. It didn’t cure in spots leaving it soft and pliable and it was SUPERRRR sticky. With a broken heart i scraped off the sticky soft spots and repeated the work ALL OVER AGAIN! What a mess. But i certainly LEARNED MY LESSON! I feel like the super hard way!
My tip is to pour Part A into a bucket, pour Part B into a separate bucket, and then mix them both (scraping the sides of each) into a 3rd bucket to mix. Mix with a paint stick thoroughly making sure to scrape the sides and the bottom.
Good luck and be sure to share your Epoxy Countertop tales!
-Kellie